

Magento
Check the exact release against your Magento Open Source version.
Recorded on version 1.0.10 · Narrated walkthrough · English captions
HTML Sitemap 1.0.10 — Magento Admin setup

00:00:00 — Set up HTML Sitemap
Welcome to the Agentic Ecom HTML Sitemap Admin guide. We'll walk through the main setup screens and the checks to make before using the module. This guide assumes the extension is already installed.

00:00:13 — Open settings and choose scope
Start in Magento Admin and open Stores, Configuration. Choose HTML Sitemap. Check the Scope selector before editing. Use the appropriate website or store view where the setting supports it. The screen values here are a demonstration; enter the settings and service details that belong to your own store.

00:00:34 — Set the sitemap address
In General Settings, enable the HTML sitemap and choose its URL key. Use a simple, memorable address. Leave Headless Storefront Mode off for Luma. For an integrated headless store, enter the correct public frontend domain and make sure the storefront has a page that renders the sitemap data.

00:00:55 — Choose the product section
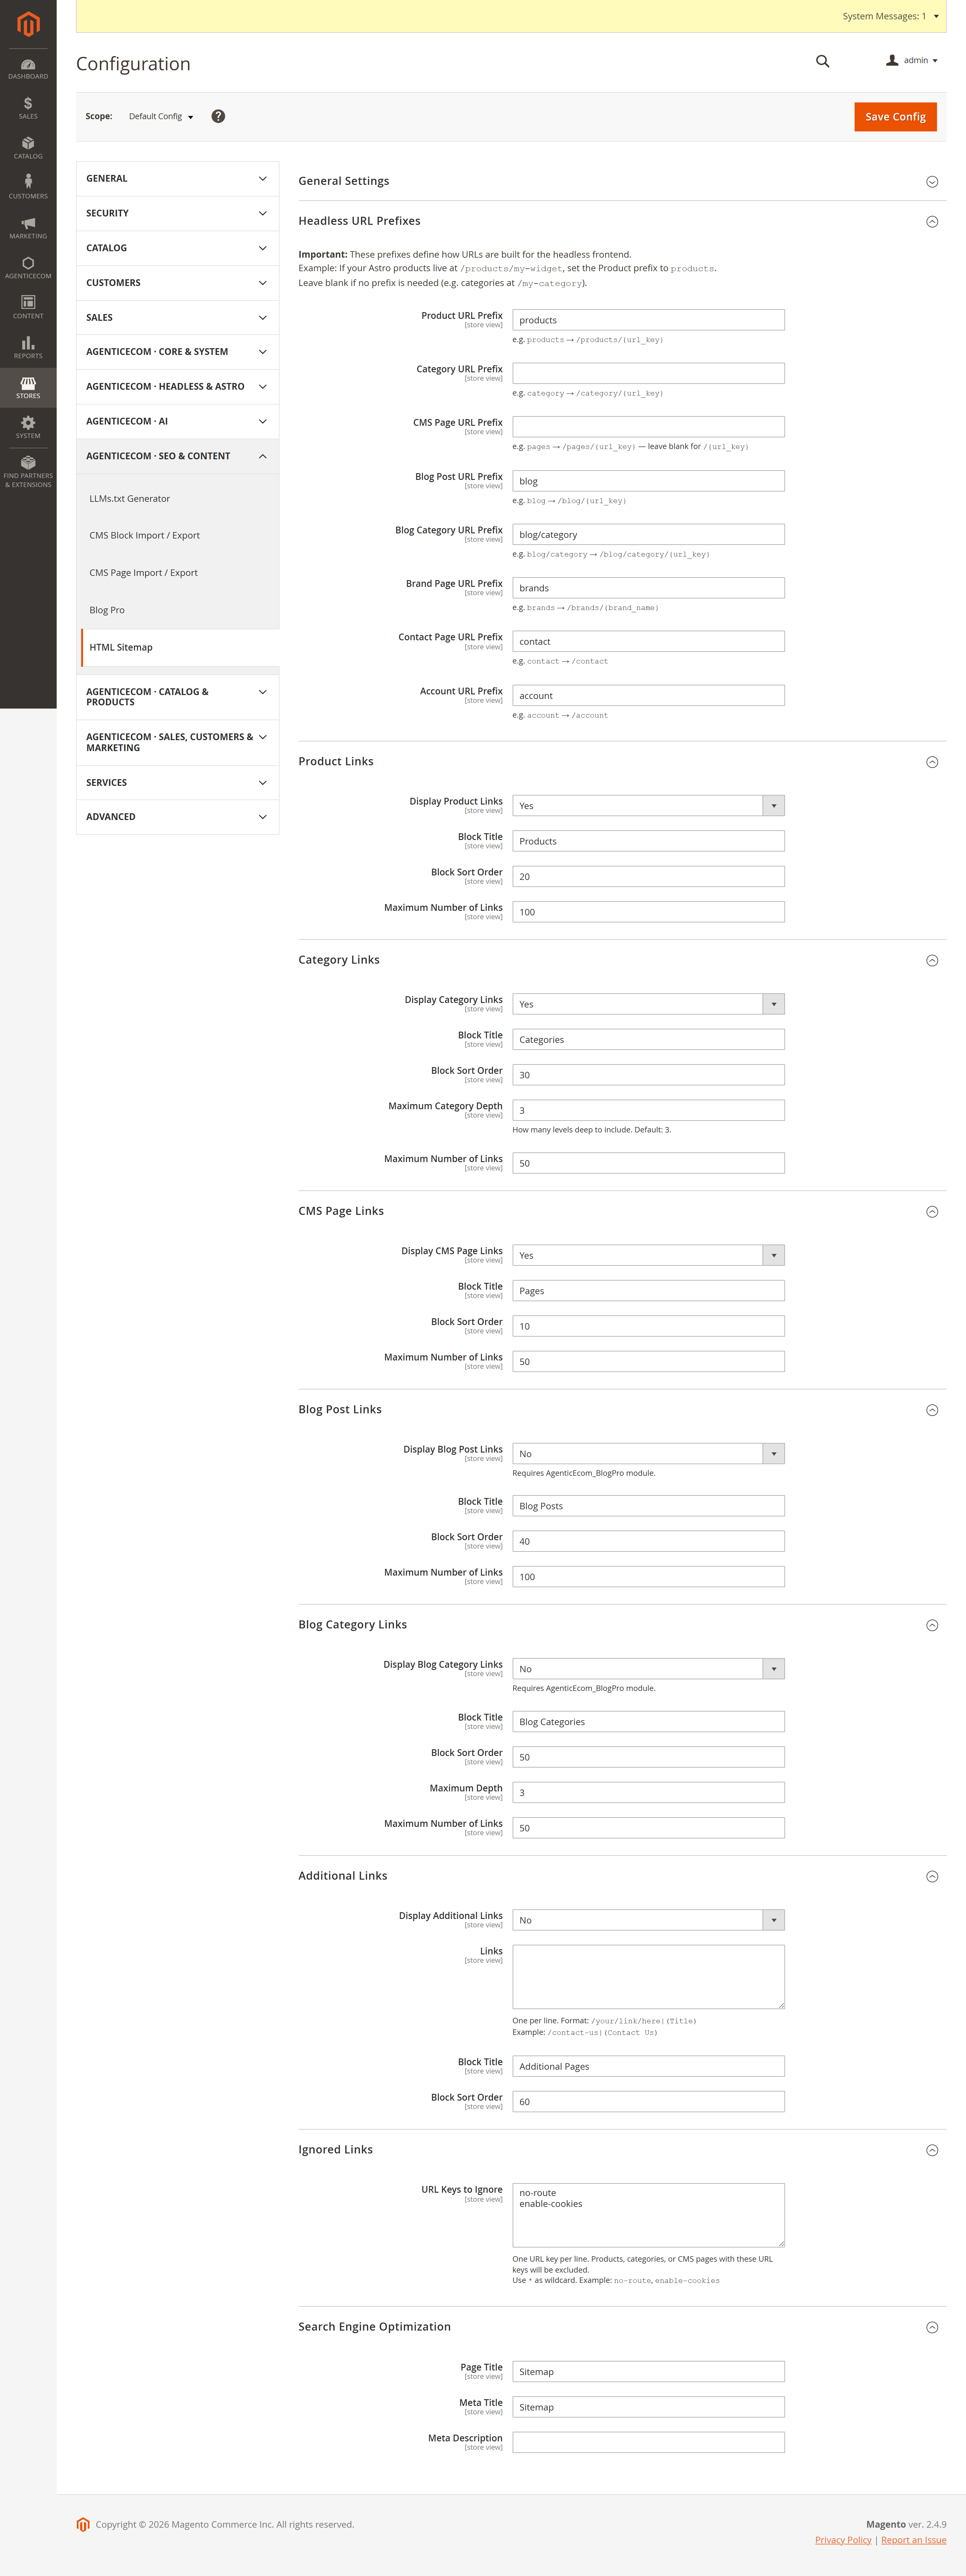
Open Product Links. Decide whether to include products, enter the section title and choose its sort order. Set a practical maximum number of links for your catalogue. The sitemap should help a visitor navigate; it does not need to become an unreadable list of every possible URL.

00:01:15 — Choose categories and other content
In Category Links, review the title, sort order, depth and link limit. The separate C M S and blog groups have their own inclusion settings. Enable only the content that exists in your store, then arrange the section order so customers can quickly find the part of the catalogue they need.

00:01:34 — Set titles and verify links
Review the page title, meta title and description in Search Engine Optimization. Use Additional Links and Ignored Links when you need to include or exclude specific destinations. After saving, open the sitemap in the intended store view and follow sample product, category and content links. Check headless URL prefixes if links point to the wrong path.

00:01:58 — Save and verify your setup
When your required settings are complete, use the screen's Save control and wait for Magento's confirmation. Then reopen the record or configuration and check the saved values at the intended scope. If the storefront still shows earlier settings, refresh the relevant caches. Test your own configuration before using it with customers.

00:02:19 — Your setup checklist
That's the Admin setup walkthrough for HTML Sitemap. Check permissions and scope, review the module-specific settings, then save and verify a small staging example. Use the written guide at user guides dot Agentic Ecom dot net for installation details, complete field references and any separate storefront integration steps.
An XML sitemap is for search engines; an HTML sitemap is for people (and a nice secondary crawl path for bots). This module builds one: a single page that lists your products, categories, CMS pages and blog posts in ordered, titled sections — and exposes the same data over GraphQL so a headless Astro storefront can render its own. It only ever lists active, visible content, with configurable limits and exclusions.
Install HTML Sitemap with Composer using your AgenticEcom licence key (find it on your My Licences page — one key unlocks every module you own):
# 1. Register the AgenticEcom repository (once per store)composer config repositories.agenticecom composer https://repo.agenticecom.netcomposer config --global --auth http-basic.repo.agenticecom.net <YOUR-LICENCE-KEY> x
# 2. Require this modulecomposer require agenticecom/module-html-sitemap
# 3. Apply itphp bin/magento setup:upgrade && php bin/magento setup:di:compile && php bin/magento cache:flushMagento
PHP
Headless
Clean
Each content type is its own section with a title, a sort order and a link limit:
| Section | Source | Filtered to |
|---|---|---|
| Products | catalog | enabled + visible-in-site products |
| Categories | catalog | active categories, to a configurable depth |
| CMS pages | CMS | active pages |
| Blog posts / categories | BlogPro (if installed) | active only |
| Additional links | your config | hand-added safe links |
The sitemap renders as a normal storefront page; product/category/CMS URLs use Magento’s native URLs.
{ htmlSitemap { sections { type title links { title url url_key } } } }In headless mode the URLs are built with your storefront’s configured prefixes, so the links point at your Astro routes — not the Magento backend.
Only what's public
Products are filtered to enabled + visible-in-site, categories to active, CMS and blog to active — so a disabled or hidden item can never surface on the sitemap.
XSS-safe extra links
Hand-added “additional links” are validated — only site-relative paths and http(s) URLs are
allowed, so a javascript: or data: URL can’t be injected into the rendered sitemap.
No — every section filters to active/visible content (enabled + visible-in-site products, active categories, active CMS and blog items), so nothing that’s hidden from the storefront appears on the sitemap.
Yes — each section has its own title, sort order and link limit, and you can exclude specific URL keys, so the sitemap stays useful rather than an unbounded wall of links.
Yes — the htmlSitemap GraphQL query returns the same sections with URLs built for your headless
routes, so your Astro storefront can render its own sitemap page from one call.
Admin-added extra links are scheme-validated (relative or http/https only), so no script URL can slip into the sitemap, and only public, active content is ever listed. Check exact-release compatibility before deployment.